The PromptsRush journal
Tutorials25 Best Nano Banana 2.1 Prompts for Product & Fashion Shots
25 copy-ready Nano Banana 2.1 prompts for ecommerce packshots, lifestyle scenes, label-accurate packaging, virtual try-on, lookbooks and campaign edits, built on Google's own prompting guide, with current API pricing and reference-image tips.
Advertisement
Nano Banana 2.1 is the image model to use for product and fashion shots right now. It is fast, it costs $0.0336 for a 1K image on the Gemini API, and Google says it is better than Nano Banana 2 at prompt adherence, text rendering and keeping a product or person consistent across references. The catch: it rewards specific, photographer-style prompts. Vague prompts give you generic stock photos; prompts that name the light, the lens and the details that must not change give you images you can actually put on a product page.
This cheat sheet gives you 25 copy-ready Nano Banana 2.1 prompts for product and fashion shots, grouped into seven sections: studio packshots, lifestyle scenes, reference-based edits of your real products, packaging and banners, on-model fashion, off-body fashion details, and campaign edits. Each prompt has a one-line use case and a note on what to change.
Short version on the source: Google released Nano Banana 2.1 (gemini-nano-banana-2.1) on 6 October 2026 as the update to Nano Banana 2. The prompts below are our templates, built on Google's Nano Banana image generation guide and its product-mockup template. If you already use our Nano Banana 2 fashion photography prompts, this is the broader, product-first follow-up.
Who These Nano Banana 2.1 Prompts Are For
- Ecommerce sellers who need listing images, colourways and lifestyle shots without booking a shoot for every SKU.
- Fashion brands and stylists building lookbooks, try-on images and ghost mannequin shots from real garment photos.
- Performance marketers who burn through ad creatives and need fresh variants every week.
- Developers wiring
gemini-nano-banana-2.1into a catalogue pipeline through the Gemini API or Batch API.
How to Use These Prompts
- Fill every [PLACEHOLDER]. Square brackets mark what only you know: the product, its exact colour, the surface and the aspect ratio.
- Upload references for anything real. Prompts 9-12 and 16-25 assume you attach photos of the actual product or model. Text alone can't reproduce your label.
- Pick the resolution on purpose. 1K for drafts and social, 2K for product pages, 4K for print, zoom views and macro detail.
- Check every image against the real product before it goes live. A generated image that misrepresents colour, fit or size is a returns problem, not a creative one.
Why Nano Banana 2.1 for Product Shots: The Facts That Shape These Prompts
Every number here comes from Google's own pages, checked on 18 November 2026: the image generation guide, the Gemini API pricing page and the Gemini image generation page.
| Spec | Nano Banana 2.1 | Why it matters for product shots |
|---|---|---|
| Model ID / release | gemini-nano-banana-2.1, GA 6 Oct 2026 | Google recommends it over Nano Banana 2 for new projects |
| Reference images | Up to 14: 10 objects with high fidelity, 4 characters | Bundles, try-on and multi-product scenes from real photos |
| Resolution | 1K, 2K, 4K (1K default) | 4K for print and zoom views |
| Aspect ratios | 1:1 to 21:9, plus 1:4, 4:1, 1:8, 8:1 | Banners and tall strips without tiling artifacts at 2K/4K |
| Thinking levels | minimal, medium (default), high | Use high for labels and multi-reference prompts |
| Grounding | Google Web and Image Search | Real-world reference look-ups (not for people) |
| API price per image | $0.0336 (1K), $0.0504 (2K), $0.113 (4K) | Batch API halves these prices |
| Watermark | SynthID on every image | Invisible, survives normal edits |
In the Gemini app, Google says Nano Banana 2.1 needs a Google AI Plus, Pro or Ultra plan; free users get Nano Banana 2. Google Pics in Workspace started rolling out the switch to 2.1 on 16 November. If you prefer a credit-based studio with presets, OpenArt and ImagineArt both offer Nano Banana 2.1; ImagineArt's docs list it at 27 credits per image and recommend it for product and ecommerce work.
Nano Banana 2.1 API cost per image
Standard vs Batch pricing by output resolution, in US cents
- Standard
- Batch
Source: Google Gemini API pricing page, checked 18 Nov 2026
Honest answer on cost: at Batch prices, a 500-image catalogue refresh at 2K is about $12.60 in image output (our arithmetic from Google's per-image figures), before input tokens and any search grounding. The expensive part is no longer generation; it is checking the results.
The Anatomy of a Good Product Prompt
Google's product-mockup template has five parts, and every prompt in this cheat sheet follows them: what the product is, where it sits, how it is lit and why, where the camera is, and which detail must be razor sharp. Add a sixth for reference work: what must stay identical.
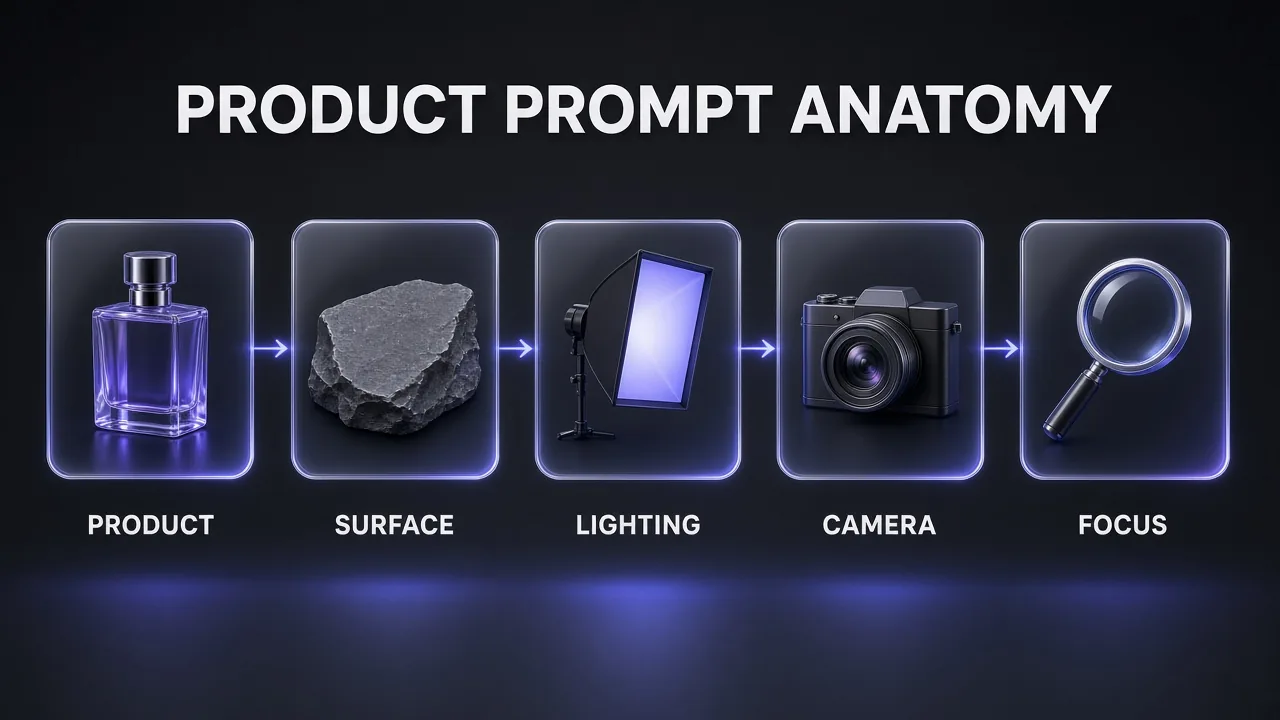
8 Meta-Rules for Nano Banana 2.1 Product Prompts
- Write sentences, not tags. Google's guide: describe the scene in rich detail. "Matte black ceramic mug on polished concrete" beats "mug, black, minimal".
- State the purpose. "For a marketplace listing" or "for a 4:5 Instagram ad" changes framing and negative space.
- Use camera language. Lens, height and angle (100mm, eye level, 45 degrees, straight down) control composition better than adjectives.
- Describe what you want, not what you don't. Google calls these semantic negative prompts: "a clean, empty marble counter" works better than "no clutter".
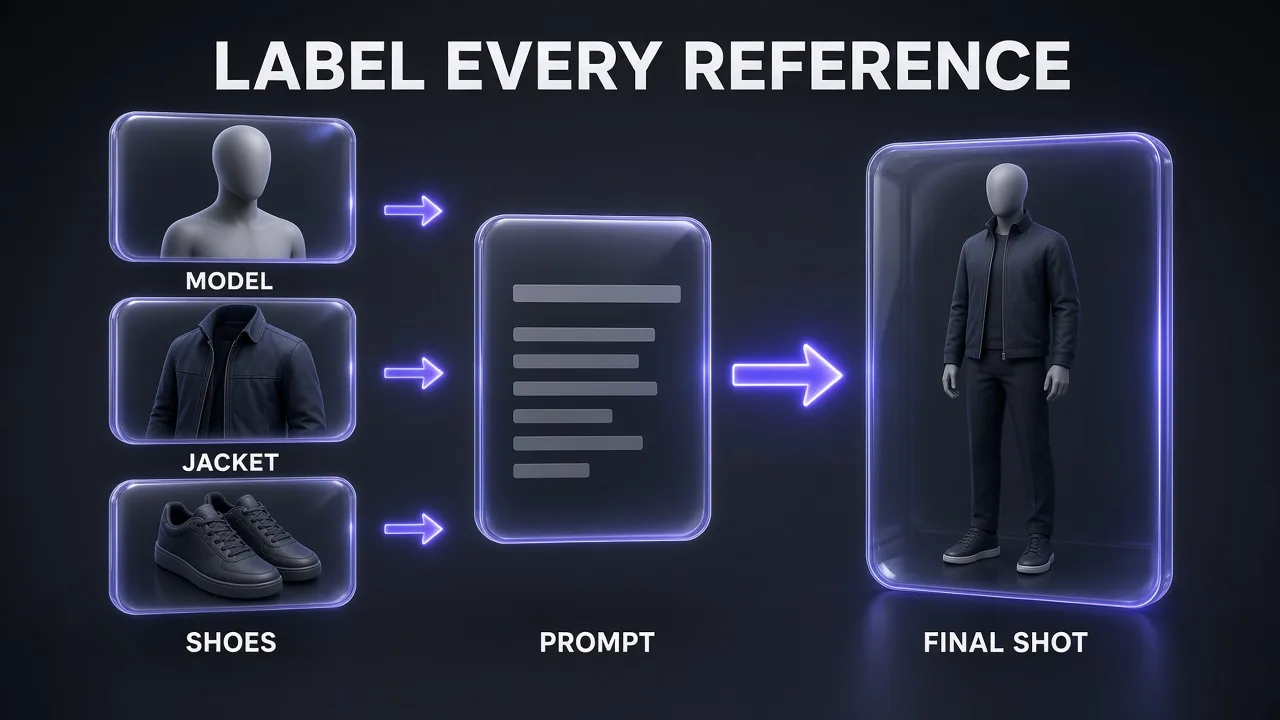
- Give every reference image a job. "Image 1 is the model, image 2 is the jacket." Unlabelled references get blended.
- Lock what must not change. List the colour, label, logo position and proportions in every edit prompt.
- Write the copy first. Google notes the model handles text best when you settle the text before asking for the image. Draft headlines with a text model (we compared the current leaders in Claude Fable vs GPT-6 Astra), then quote them exactly.
- Edit one change at a time. Colour, then background, then light. Stacked edits are where drift creeps in.
Pro tip: Save a "house style" paragraph (backdrop, light direction, lens, colour grade) and paste it into every prompt for one brand. Consistency across a product range comes from repeated wording, not from luck.
Studio Packshot Prompts (1-4)
Start here for marketplace listings and product pages. These four prompts follow the structure of Google's own product-mockup template: product, surface, lighting setup and its purpose, camera angle, then the one detail that must be sharp. Use medium thinking and 2K for listings; 4K only for print or heavy cropping. For a single ready-made template, the Promptsrush library also has an ultra-sleek product mockup prompt.
1. Clean White-Background Listing Shot
Marketplace hero image where the product must read instantly at thumbnail size.
A high-resolution, studio-lit ecommerce product photograph of [PRODUCT, e.g. a matte sage-green stainless steel water bottle with a bamboo lid], standing upright and centred on a seamless pure white background. The lighting is a large overhead softbox plus two strip lights at 45 degrees, designed to give even, shadowless illumination with one soft contact shadow directly under the product. The camera is at product height with a 100mm lens look, straight-on, so the silhouette is perfectly symmetrical. The product fills about 80% of the frame height with even white margins on all sides. Ultra-realistic, with sharp focus on [KEY DETAIL, e.g. the brushed steel texture and the lid's wood grain]. Colours must match [EXACT COLOUR + HEX IF KNOWN]. Square 1:1 image.
Marketplaces crop and shrink hero images hard, so the prompt fixes the fill ratio and the shadow. Ask for the exact colour by name and hex: colour drift is the most common reason a generated listing image gets returned.
2. 45-Degree Three-Point Hero
Product-page hero that shows shape, depth and one signature feature.
A high-resolution, studio-lit product photograph of [PRODUCT] presented on [SURFACE, e.g. a slab of polished light-grey concrete]. The lighting is a three-point softbox setup designed to create soft, diffused highlights along the edges and eliminate harsh shadows, with a subtle rim light separating the product from a [BACKGROUND TONE, e.g. warm charcoal] gradient background. The camera angle is a slightly elevated 45-degree shot to showcase [SIGNATURE FEATURE, e.g. the curved front panel and the side buttons]. Shallow depth of field, background softly falling off. Ultra-realistic, with sharp focus on [DETAIL]. Landscape 3:2 image.
This is Google's template almost word for word, with two additions: a rim light and a named background tone. Those two lines are what turn a flat catalogue photo into a hero you can put text beside.
3. Floating Product With Ingredient Splash
Ad creative for beverages, skincare and food where motion sells freshness.
A high-speed commercial product photograph of [PRODUCT, e.g. a slim aluminium can of sparkling lime water] floating at a slight tilt in the centre of the frame, surrounded by a frozen splash of [INGREDIENTS, e.g. clear water droplets, two lime wheels and crushed ice]. The background is a smooth gradient from [COLOUR A] to [COLOUR B]. Lighting: hard key light from the upper left to make the droplets sparkle, soft fill from the right, and a backlight that makes the liquid glow. Every droplet is crisp, as if shot at 1/8000s. The product label faces the camera and stays sharp and undistorted. Clean, premium, no clutter, nothing touching the frame edges. Vertical 4:5 image for a social feed.
Splash shots used to need a high-speed rig and dozens of takes. Keep the ingredient list to two or three items; more than that and the model starts inventing fruit.
4. Top-Down Flat Lay Kit
Showing everything in the box, a bundle, or a starter kit in one frame.
A top-down flat lay product photograph on [SURFACE, e.g. a textured off-white linen cloth]. Arranged in a neat, evenly spaced grid: [ITEM 1], [ITEM 2], [ITEM 3], [ITEM 4] and [ITEM 5]. Each item lies flat, parallel to the frame edges, with generous breathing room between items. Soft, even daylight from a large window on the left creates gentle shadows to the right. Muted, natural colour grade. Shot straight down at 90 degrees, no perspective distortion. Ultra-realistic textures. Square 1:1 image.
Name every item in the order you want it to appear. If the count matters, say "exactly five items" and check: Google notes the model does not always follow exact counts.
Lifestyle and In-Context Prompts (5-8)
Lifestyle images answer the shopper's real question: what does this look like in my life? Describe the room, the time of day and who would own it. Nano Banana 2.1's gains in lighting and physical textures, which Google lists in its Pics upgrade note, matter most here.
5. Kitchen Counter Morning Scene
Home, kitchen and food products shown in a believable domestic setting.
A photorealistic lifestyle photograph of [PRODUCT] on a [COUNTER, e.g. white marble kitchen counter] in a bright Scandinavian-style kitchen at 8am. Morning sunlight streams through a window behind and to the left, casting long soft shadows and a gentle highlight on the product. In the softly blurred background: a ceramic fruit bowl, a small potted herb and a wooden chopping board. The product is the clear hero in the left third of the frame, sharp and true to its real colours, with negative space on the right for ad copy. Shot on a 50mm lens at eye level, natural colour grade, no people. Landscape 16:9 image.
"Negative space on the right for ad copy" is the most useful phrase in this cheat sheet. It saves you from regenerating when the design team needs room for a headline.
6. Outdoor Golden-Hour Adventure
Outdoor, travel, sports and fitness gear.
A cinematic outdoor product photograph of [PRODUCT, e.g. a rugged orange hiking backpack] resting on a sun-warmed rock at the edge of a mountain trail during golden hour. Behind it, out-of-focus pine trees and a distant ridge line glow in warm backlight. The product faces the camera at a three-quarter angle, with its [KEY FEATURES, e.g. side pockets and buckle straps] clearly visible and in sharp focus. Light dust particles catch the sunlight. Natural, slightly warm colour grade, high dynamic range, shot on a 35mm lens close to ground level. Landscape 3:2 image.
Low camera height makes small products feel heroic. If the product looks too large for the scene, add "true-to-scale next to the rock".
7. UGC-Style In-Hand Shot
Social ads that need to look like a customer took the photo, not a studio.
A casual, authentic smartphone-style photo of a hand holding [PRODUCT] in front of [SETTING, e.g. a sunny café window]. The hand is relaxed and natural, with short unpolished nails, holding the product so its front label faces the camera. Slight natural lens distortion, soft window light, realistic skin texture, a touch of background clutter that feels lived-in. The product label is sharp and readable; the background is gently blurred. Not overly polished, no studio lighting, no dramatic grading. Vertical 9:16 image.
UGC-style images convert because they look unstaged, so the prompt tells the model what to leave out. For a full ad pipeline with avatars and voiceover, see our AI UGC ad factory workflow.
8. Bathroom Shelf Skincare Set
Beauty and personal care, where texture and cleanliness sell.
A soft, luxurious lifestyle photograph of [PRODUCT LINE, e.g. three frosted-glass skincare bottles with silver caps] arranged on a floating oak bathroom shelf. Background: pale stone wall tiles with a faint water sheen, a folded white towel and a small eucalyptus sprig. Diffused daylight from a frosted window above, creating gentle highlights on the glass and soft shadows. Calm, spa-like mood, muted neutral palette with [ACCENT COLOUR] from the products. The bottles are arranged tallest to shortest, left to right, labels facing forward. Sharp focus on the bottles. Portrait 4:5 image.
Beauty brands live and die on consistency. Once you like the shelf, keep this prompt fixed and only swap the product line, so every SKU sits in the same world.
Reference-Based Product Prompts (9-12)
This is where Nano Banana 2.1 earns its place. Google's docs say the model takes up to 14 reference images, with high fidelity for up to 10 objects and resemblance for up to 4 characters. Upload clean, well-lit photos of the real product, and use high thinking for anything with a label.
9. Put My Real Product in a New Scene
Recontextualise an existing packshot without reshooting.
Use the uploaded image as the exact product reference. Keep the product identical: same shape, proportions, cap, colours, label layout and all label text exactly as in the reference. Do not redesign, restyle or re-letter anything on the product. Place it in a new scene: [SCENE, e.g. on a sunlit wooden picnic table beside a woven basket and a folded checked blanket, late afternoon]. Match the scene lighting to the product: light comes from [DIRECTION], so the product's highlights and its contact shadow fall consistently. The product sits in the [POSITION] of the frame and stays sharp. Photorealistic. [ASPECT RATIO].
The repeated "keep identical" lines feel redundant, but they are Google's own advice: describe the details that must survive an edit in full. The lighting-direction line is what stops the pasted-on look.
10. Multi-Angle Set From One Photo
Filling a product gallery when you only have one good photo.
Using the uploaded product photo as the only reference, create a [front / three-quarter left / back / top-down] view of the same product on a seamless light-grey background. Keep every visible detail identical to the reference: colour, materials, logo position, stitching and proportions. For surfaces not visible in the reference, keep them plain and consistent with the visible design; do not invent new logos, text, buttons or patterns. Soft, even studio lighting with a faint contact shadow. Square 1:1 image.
Run it once per angle rather than asking for four views in one image. Check the back and top views carefully against the real product: any surface the reference doesn't show is the model's best guess.
11. Colourway Variants
Showing every colour option without photographing every SKU.
Edit the uploaded product photo. Change only the colour of [PART, e.g. the knit upper of the sneaker] to [NEW COLOUR + HEX]. Keep everything else exactly the same: the sole, laces, logo, stitching, materials, background, lighting, shadows, camera angle and framing. The new colour has the same fabric texture and sheen as the original. Do not change anything that is not the [PART].
One change per edit, with the rest locked in writing. Run the prompt once per colour and export each as its own file; your colour swatches on the product page will now match real images.
12. Bundle Shot From Separate Product Photos
Gift sets, bundles and "complete the look" images from individual packshots.
Image 1 is [PRODUCT A], image 2 is [PRODUCT B], image 3 is [PRODUCT C] and image 4 is [PRODUCT D]. Combine all four into one gift-set photograph: they stand together inside [PACKAGING, e.g. an open kraft-paper gift box lined with tissue], [PRODUCT A] in the centre and the others arranged around it. Keep each product identical to its reference image, including labels and colours. Unified soft studio lighting from the upper left so all four products share the same highlights and shadow direction. Clean [BACKGROUND] background. Photorealistic. Landscape 4:3 image.
Give every reference image a job, by number. OpenArt's own Nano Banana 2.1 prompt guide gives the same advice, and it's the difference between a clean bundle and four products melting into each other.
Packaging, Label and Banner Prompts (13-15)
Google lists sharper text rendering as one of 2.1's main upgrades, and its docs also note fixed tiling artifacts on wide and panoramic ratios at 2K and 4K. Keep on-image text short, put every string in quotes, and write the copy before you ask for the image.
13. Packaging Mockup With Exact Brand Text
Pitching a new packaging design or a private-label product.
A photorealistic packaging mockup of a [PACKAGE TYPE, e.g. matte kraft stand-up pouch with a resealable zip] standing on a light oak surface against a soft beige wall. The front label is printed in [LABEL STYLE, e.g. a deep forest-green rectangle] with this text, spelled exactly: brand name "[BRAND]" at the top in a bold serif, product name "[PRODUCT NAME]" below it, and "[WEIGHT, e.g. 250 g]" in small type at the bottom. No other text on the package. Soft diffused daylight from the left, subtle paper texture visible, gentle shadow. Three-quarter view at eye level. Portrait 4:5 image.
Three strings is the comfortable limit. ImagineArt's own model guide suggests a different model when the job is small, dense label text or fine print; keep ingredient lists and legal copy for the real artwork.
14. Promo Card With Price
Sale and launch graphics for social posts.
A clean promotional product graphic for social media. [PRODUCT] stands on a short cylindrical podium in the lower centre of the frame, lit by soft studio light, against a smooth [COLOUR] gradient background. At the top, a bold sans-serif headline reads "[HEADLINE, 2-4 WORDS]". Below the product, a rounded badge reads "[PRICE OR OFFER, e.g. 30% OFF]". Render only the quoted text, spelled exactly; no other words, no fake logos, no small print. Balanced layout with generous margins. Square 1:1 image.
Two strings and a podium is the formula behind most of the sale graphics you'll see this Black Friday. If you are planning a campaign around deals, our Black Friday AI tool deals tracker lists the creative tools currently on offer.
15. Wide Website Banner (4:1)
Homepage hero strips and marketplace store banners.
A wide panoramic website banner photograph. On the right third, [PRODUCT] sits on [SURFACE] in soft directional light from the left. The left two-thirds is calm, uncluttered [BACKGROUND, e.g. a softly lit sand-coloured plaster wall] reserved for website text, with no objects in it. Consistent lighting and perspective across the full width, no repeated patterns or tiling, no visible seams. Photorealistic, premium, muted palette. Panoramic 4:1 aspect ratio at 2K.
The 4:1 and 8:1 ratios are API and ImagineArt options. OpenArt's Nano Banana 2.1 page lists ratios from 21:9 to 9:16, so use 21:9 there and crop.
Fashion On-Model Prompts (16-19)
Fashion prompts need two things product prompts don't: a body and a mood. Use photos of models you have the rights to (a signed release or your own team), and name the garment details that must survive, such as print, fabric and hardware.
16. Virtual Try-On From Garment Photos
Putting real catalogue garments on a consistent model.
Image 1 is the model. Images 2, 3 and 4 are the garments: [GARMENT 1, e.g. an oversized cream cable-knit sweater], [GARMENT 2, e.g. wide-leg charcoal wool trousers] and [GARMENT 3, e.g. brown leather loafers]. Dress the model from image 1 in all three garments. Keep the model's face, hairstyle, skin tone and body proportions identical to image 1. Keep each garment identical to its reference: colour, knit pattern, fabric texture, fit and details. Full-body shot, the model standing in a relaxed contrapposto pose in a minimal studio with a warm grey backdrop. Soft key light from the front left, gentle fill, natural fabric folds and drape. Photorealistic fashion catalogue photography. Portrait 2:3 image.
This is the prompt most brands will use daily. Fit is the weak spot of any try-on: always compare length and drape against the real garment before you publish, and never use it to show fit claims you haven't checked.
17. High-Fashion Studio Editorial
Lookbook openers and campaign key visuals.
A high-fashion editorial photograph of a model wearing [OUTFIT, e.g. a sculptural black satin trench coat with oversized lapels]. The model stands at a dramatic three-quarter angle against a seamless [BACKDROP COLOUR] paper backdrop, one hand in a pocket, chin slightly raised, a calm and confident expression. Hard, directional light from a single beauty dish high on the left creates crisp shadows and a strong silhouette; a faint rim light outlines the coat. Rich contrast, glossy magazine finish, fabric sheen and seams clearly visible. Shot on a medium-format camera look, 80mm lens, full-length framing with headroom. Portrait 4:5 image.
One light source is the shortcut to an editorial look. For a fill-in-the-blanks version, try our high-fashion editorial prompt in the Promptsrush library.
18. Street-Style Candid
Social-first fashion content that feels shot on the street, not in the studio.
A candid street-style fashion photograph of a model walking across a [CITY STREET, e.g. quiet cobblestone street in Paris] on an overcast morning, wearing [OUTFIT]. Caught mid-stride, looking slightly away from the camera, coat moving naturally with the step. Soft, even overcast light, muted city tones, shallow depth of field so the background buildings blur gently. Shot from across the street with an 85mm lens look at chest height. Natural skin texture, realistic fabric movement, no posed studio feel. Portrait 4:5 image.
"Mid-stride" and "looking slightly away" do most of the work here. Remove them and you get a posed catalogue shot on a street backdrop.
19. Four-Look Lookbook With One Model
A consistent seasonal lookbook without booking a full shoot.
Image 1 is the model. Create a fashion lookbook photo of the same model from image 1, identical face, hair and body, wearing [LOOK N: OUTFIT DESCRIPTION]. Same set as the rest of the series: [SET, e.g. a sunlit loft with white-painted brick walls and a concrete floor], same soft window light from the left, same camera height and 50mm lens look, full-body framing with the model centred. Natural, relaxed pose: [POSE]. Photorealistic, consistent colour grade: [GRADE, e.g. soft, slightly warm film tones]. Portrait 2:3 image.
Run it once per look and keep everything except the outfit and pose fixed. Writing the "same set" paragraph once and pasting it every time is how you get a series rather than four unrelated photos.
Flat Lay, Ghost Mannequin and Detail Prompts (20-22)
Not every fashion image needs a model. These three cover the off-body shots every product page needs, and they are where the 4K output pays off for zoom-in views.
20. Ghost Mannequin Product Shot
Apparel listings where the garment's shape matters more than a model.
Using the uploaded garment photo as the reference, create a ghost mannequin (invisible mannequin) product photograph of the same [GARMENT]. The garment appears worn by an invisible body: natural 3D shape, open neckline showing the inside back label area, sleeves slightly away from the body. Keep the garment identical to the reference: colour, fabric, buttons, stitching and any print. Pure white background, soft even studio lighting, a faint shadow below. Front view, centred, the garment filling 85% of the frame height. Square 1:1 image.
Ghost mannequin used to mean two shots and an hour of retouching. Check the inner collar: if the reference never showed it, keep that area plain rather than letting the model invent a label.
21. Outfit Flat Lay
"Shop the look" images and outfit-of-the-day content.
A styled top-down outfit flat lay on [SURFACE, e.g. a light washed-oak floor]: [TOP] folded neatly in the upper centre, [BOTTOM] laid below it, [SHOES] at the bottom right, [BAG] at the left, and [2 ACCESSORIES] placed in the gaps. Natural, slightly casual arrangement with balanced spacing, nothing overlapping. Soft daylight from the top left, gentle shadows. Shot straight down at 90 degrees. True-to-life fabric textures and colours. Portrait 4:5 image.
Assign each item a position. A list of items without positions produces a pile; a list with positions produces a layout a stylist would sign off.
22. Fabric and Hardware Macro
Zoom-in detail images that prove quality.
An extreme close-up macro photograph of [DETAIL, e.g. the brass zipper pull and the pebbled leather grain on a tan crossbody bag]. Razor-sharp focus on the [FOCAL POINT], with the surrounding material falling softly out of focus. Low raking light from the side reveals every texture: grain, stitching, edge paint. Rich but true-to-life colours, no colour cast. Shot with a 100mm macro lens look. Landscape 3:2 image at 4K.
Macro shots are where texture claims get tested. Use them to show what the product really looks like up close, and compare against the physical item before you publish.
Campaign and Edit Prompts (23-25)
The last three prompts work on images you already have. Google's Pics upgrade note says 2.1 makes targeted edits with significantly fewer unrequested changes to surrounding subjects, backgrounds and brand elements. Edit one thing at a time and say what must stay.
23. Seasonal Campaign Restyle
Turning an evergreen product shot into a seasonal one.
Edit the uploaded product photo for a [SEASON / CAMPAIGN, e.g. winter holiday] campaign. Keep the product exactly as it is: shape, colours, label and position. Replace only the background and props: [NEW SET, e.g. a dark green velvet surface with scattered pine sprigs, a few gold baubles and soft out-of-focus fairy lights]. Adjust the lighting on the product so it matches the new warm, cosy scene, with a gentle warm highlight from the right. No text. Same framing and aspect ratio as the original.
Keep a neutral master shot of every product and restyle it per season. It is faster than a new generation and the product stays pixel-faithful.
24. Relight Without Changing the Product
Fixing flat lighting on supplier photos.
Edit the uploaded photo. Change only the lighting: make it a [LIGHTING STYLE, e.g. dramatic low-key setup with a single soft key light from the upper left and a cool rim light from behind]. Keep the product, its colours, label, position, background objects and composition exactly the same. Deepen the shadows on the right side and add a subtle reflection on the surface below the product. Photorealistic, no new objects, no text.
If the edit drifts, ask again with a smaller change. For heavy relighting and upscaling of finished images, our Magnific review covers the dedicated tools.
25. Model Swap for Regional Campaigns
Running the same fashion campaign with a different model for another market.
Image 1 is the original campaign photo. Image 2 is the new model. Replace the person in image 1 with the model from image 2, keeping the new model's face, hair and skin tone identical to image 2. Keep everything else from image 1 exactly the same: the outfit, its fit and colours, the pose, the set, the lighting, the camera angle and the framing. Natural, consistent shadows on the new model. Photorealistic. Same aspect ratio as image 1.
Only use photos of models who have agreed to this use, and disclose AI edits wherever your market or platform requires it. Every Nano Banana image also carries Google's invisible SynthID watermark.
How to Chain These Prompts Into a Full Product Shoot
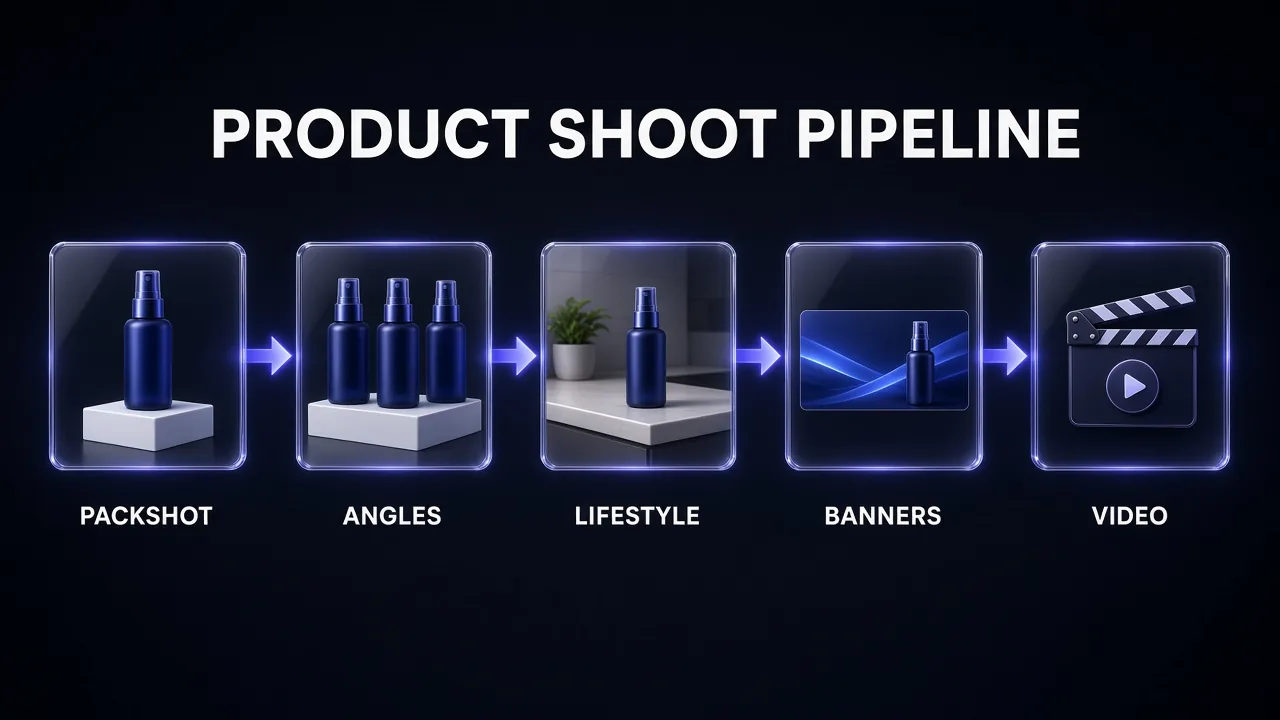
The prompts work best as a pipeline, not as one-offs. Here is the order we recommend for a new product launch:
- Master packshot (Prompt 1 or 2). One clean, approved image of the real product becomes the reference for everything else.
- Angles and colourways (Prompts 10 and 11). Fill the product gallery from the master.
- Lifestyle and campaign scenes (Prompts 5-9, 23). Recontextualise the master; never regenerate the product from text.
- Banners and promo cards (Prompts 14 and 15). Add copy last, in quotes, at 2K.
- Motion. Feed the best stills into a video model as first frames.
For that last step, our Kling 4.0 vs Wan 3 comparison covers which video model handles product motion best, and the Kling character consistency guide shows how to keep a fashion model looking the same once the stills start moving.
Common Mistakes With Nano Banana 2.1 Product Prompts
- Generating the product from text. Without a reference, the model invents a product that looks like yours. Use reference prompts for anything you sell.
- Too much text on the image. A headline and a price work. Ingredient lists, sizes and legal copy belong in the real artwork.
- Asking for a grid of variants in one image. Google notes the model doesn't always follow exact image counts. One angle or colour per run is more reliable.
- Mismatched light. A product lit from the left in a scene lit from the right looks pasted on. Name the light direction in every recontext prompt.
- Skipping the real-product check. Generated fit, colour or scale that doesn't match the item misleads shoppers. Compare before you publish.
- Using people without permission. Try-on and model swaps need photos you have the rights to. Google's search grounding also won't pull real people's images.
Verdict: Is Nano Banana 2.1 Good Enough for Product and Fashion Work?
My take: yes, for most ecommerce and social imagery, as long as you work from real reference photos. The combination of 10 object references, 4 character references, cleaner text and 1K images at $0.0336 makes it the default workhorse for catalogue variants, lifestyle scenes and seasonal restyles. It does not replace a real shoot for your master packshot, fine label text or fit-critical fashion images, and Google still positions Nano Banana Pro as the premium option for the most complex instructions.
Start with Prompts 1, 9 and 16. If those three work for your products, the rest of the cheat sheet will too.
Frequently Asked Questions
9 questions answered