How to Keep Characters Consistent in Kling AI Videos
Kling keeps a character consistent when you give it a reusable reference, not a description. The full Kling 3.0 workflow: character lock, turnaround references, Elements, anchor frames, Multi-Shot and end-frame chaining, plus prompts and a drift fix table.
Advertisement
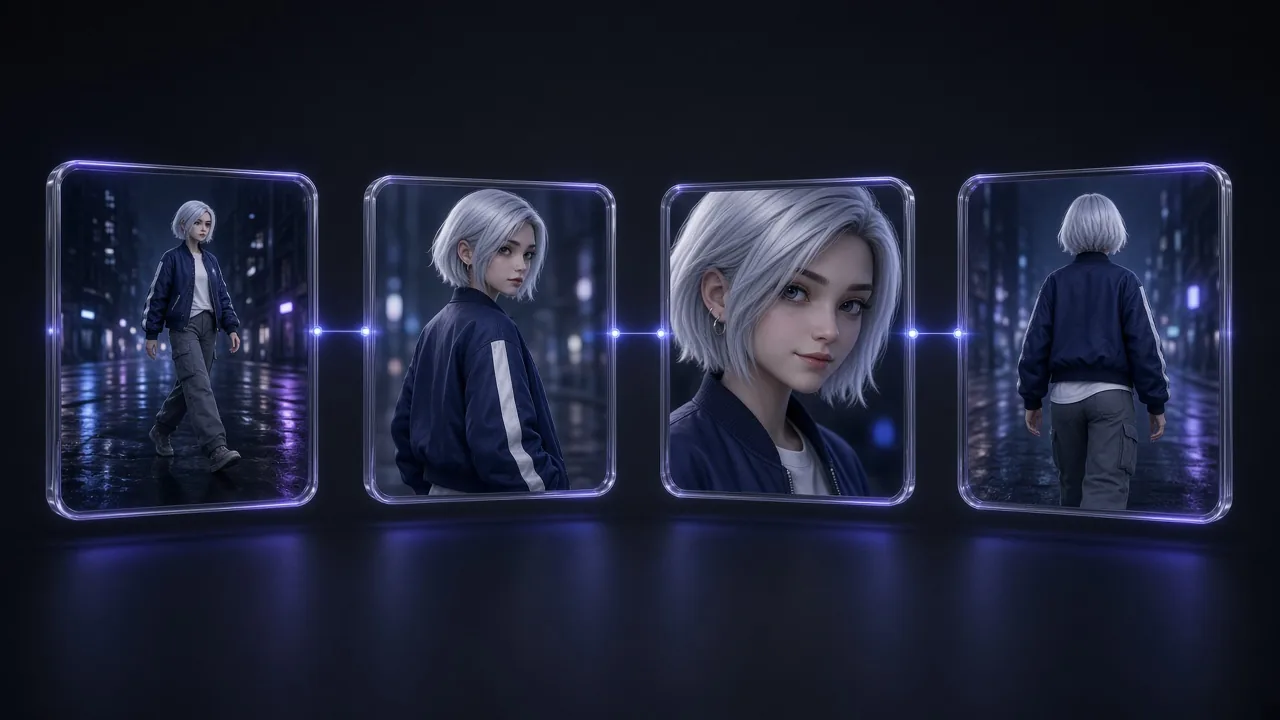
Short version: Kling keeps a character consistent when you stop asking it to remember a description and start giving it a reusable reference. Build the character once as an Element from two to four clean reference images, bind that Element to every shot, write the face and outfit into a fixed "character lock" you never paraphrase, and chain clips through frames rather than fresh prompts. Do that and the same person walks through shot one, shot six and the extended ending.
This guide is the full workflow for Kling 3.0, the version most creators are on right now: why characters drift, how to prepare a reference set that actually holds, the exact Element settings and limits Kling documents, copy-ready prompts for each stage, a troubleshooting table for the failures you will hit, and how to handle two or more characters in one scene. If you want shot ideas rather than a process, our 50 Kling AI prompts for cinematic videos pair well with everything here.
Why Characters Drift in AI Video
A video model does not store your character anywhere. Every generation rebuilds the person from whatever you gave it this time: a sentence, an image, maybe a few references. When those inputs leave room for interpretation, the model fills the gaps differently on each run, and that is what drift is. Five gaps cause most of it.
- Text is ambiguous. "A woman in her twenties with short silver hair" describes thousands of faces. Each generation picks one of them.
- One image hides most of the character. A single front-facing photo says nothing about the back of the jacket or the profile of the nose, so the model invents them the moment the camera moves. Kling's own Element guide makes the same point: more reference angles improve multi-view consistency.
- Camera moves and occlusion. Orbits, head turns, hands passing in front of the face and long walks away from camera all force the model to redraw features it can't currently see.
- Style words fight identity. Change "cinematic film still" to "anime" between shots, or add a new lighting mood, and the face is restyled along with everything else.
- Attribute bleed between characters. With two people in frame, a red scarf or a beard can jump from one to the other when the prompt doesn't tie each detail to one named character.
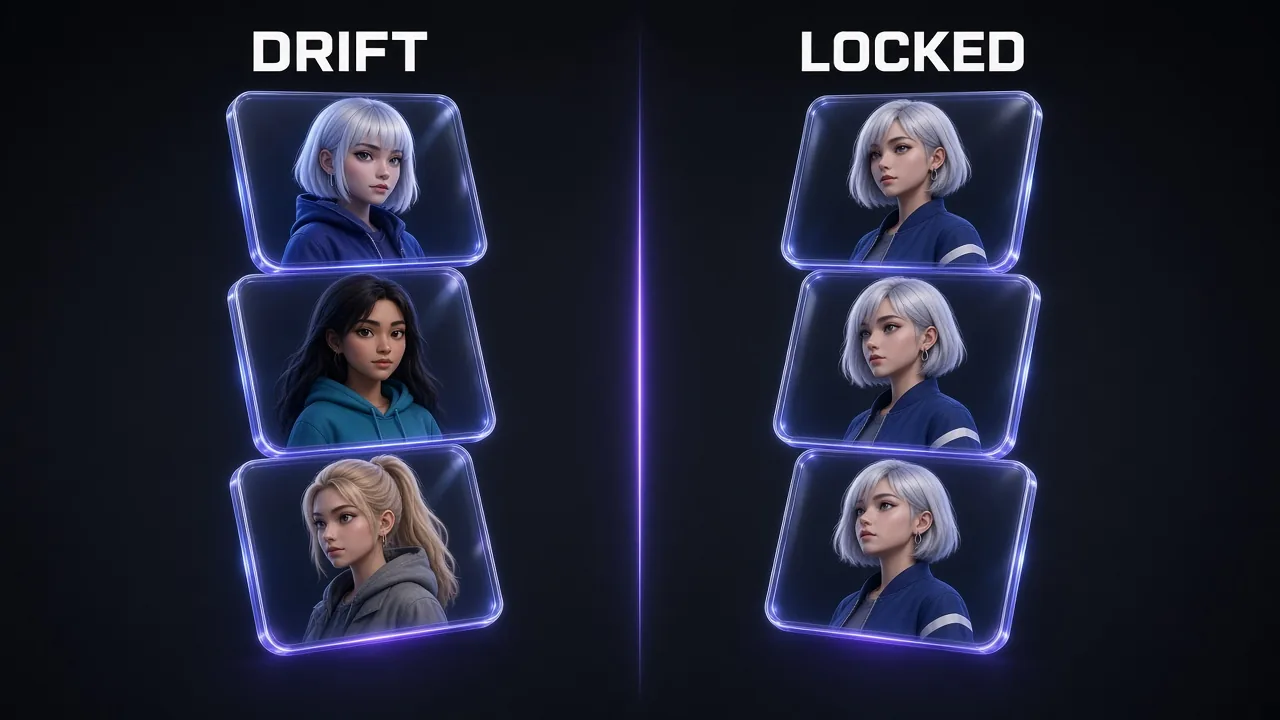
Every technique in this guide closes one of those gaps. References close the "one image" gap, the character lock closes the text gap, fixed style lines close the style gap, and per-character naming closes the bleed gap. Camera moves you manage with start frames, bound Elements and sensible shot lengths.
The Kling Consistency Toolkit in 2026
Kling has more consistency features than most people use, and they live in different places. Kling upgraded VIDEO 2.6 to VIDEO 3.0 and VIDEO O1 to VIDEO 3.0 Omni in February 2026, and the Element Library sits underneath both. Here is what each feature does for consistency, with the limits from Kling's own user guides (checked October 11, 2026).
| Feature | Where | What it locks | Documented limits |
|---|---|---|---|
| Element Library (multi-image) | Omni "Create Element", Video 3.0 bind button, Assets page | Face, body, outfit, props, scenes | 2–4 images per Element (1 main + up to 3 extra); free to create |
| Video character Element | VIDEO 3.0 Omni (record in the app, or upload) | Appearance plus native voice | 3–8 second clip of a single character |
| Element voice binding | Character Elements in 3.0 Omni | Voice tone across videos | 5–30 second single-speaker audio, or the Voice Library |
| Bind Subject to Enhance Consistency | VIDEO 3.0 image-to-video | Characters in the start (and end) frame | Up to 3 Elements, which must appear in the frames |
| Omni references | VIDEO 3.0 Omni, called with "@" | Several characters, props and a scene at once | Up to 7 images/Elements, or 4 if a video is in the input |
| Start & End Frames | Image to Video, "Add End Frame" | Where a clip begins and lands | Frames should be similar, or the model may cut |
| Multi-Shot / Custom Multi-Shot | VIDEO 3.0 and 3.0 Omni | One character across several shots in one generation | 3–15 seconds per generation |
| Extend with Prompts | Tab under a generated video | Continuity past the clip's end | +4–5 seconds per extension, up to 3 minutes total |
| Motion Control 3.0 + facial Element | Motion Control | Face identity during copied movement | Face only; one Element; orientation must match the video |
| Motion Brush + Static Brush | Image to Video, where your model offers it | Which parts move, which stay put | Up to 6 brushed elements |
Two things are missing from that table on purpose. First, a seed. We could not find a seed control in any of Kling's 3.0 user guides, so this guide does not pretend you can lock one; you lock the model, mode, resolution, aspect ratio, duration, Element and style line instead. Second, the standalone Lip Sync tool. Kling's guide for it covers videos made with Kling 1.0 and 1.5. On 3.0, lip sync comes from native audio and from a voice bound to your Element, which is the better route anyway because the voice stays tied to the character. For what each of these costs in credits, our Kling AI pricing breakdown has the plan-by-plan maths.
The Workflow at a Glance
Consistency is decided before you press Generate on the first clip. These seven steps move from the cheapest fixes (writing and images) to the most expensive (video generations), so mistakes are caught when they cost least.
- Write the character lock: a fixed paragraph describing face, hair, build, outfit and style.
- Build the reference set: a front view plus two or three angles on a neutral background, same outfit in every image.
- Create the Element in Kling's Element Library, with a voice if the character speaks.
- Make an anchor frame for each scene with the Element in it.
- Write shot prompts that call the Element and describe action, not appearance.
- Use Multi-Shot to keep a whole scene inside one generation.
- Chain clips with end frames, last-frame handoffs and Extend.
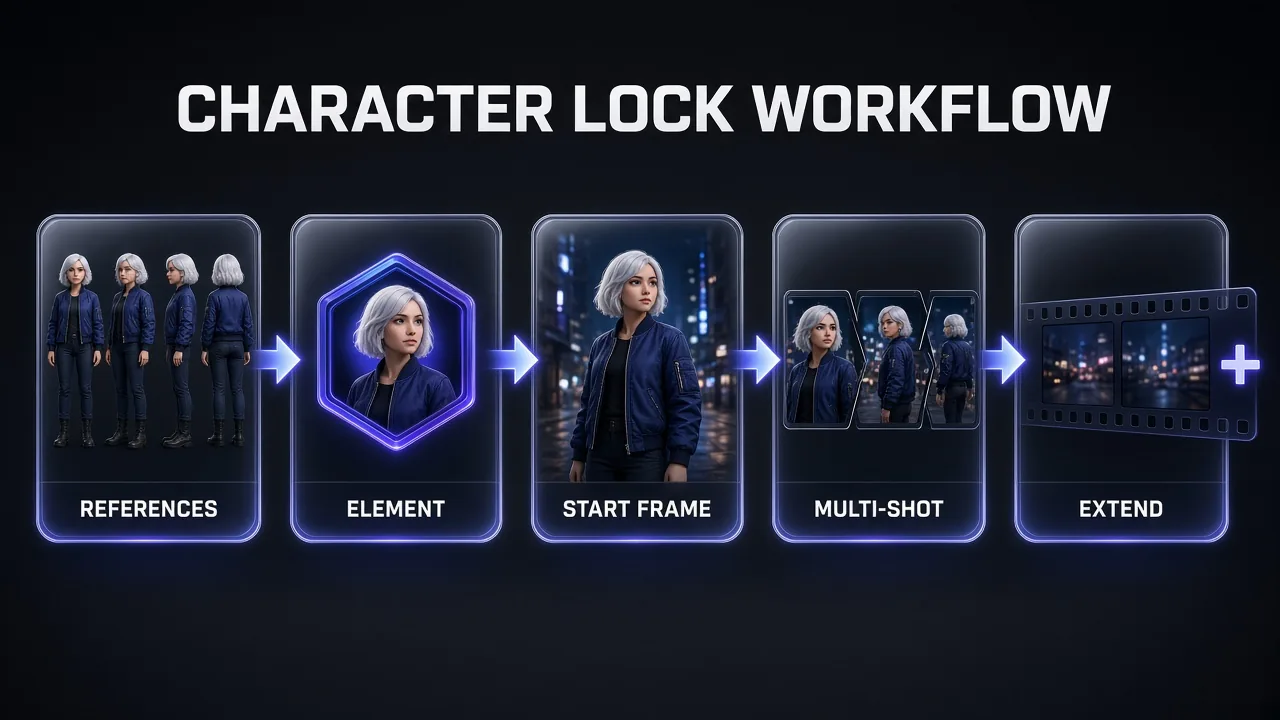
Skipping straight to step five is the most common reason people decide Kling "can't do consistency". It can; it just needs the first four steps to have something to be consistent with.
Step 1: Write a Reusable Character Lock
The character lock is one paragraph, 40 to 70 words, that describes the character in fixed order: species and age range, face, hair, build, outfit from top to bottom, one signature detail, and the rendering style. You paste it, word for word, into the Element description and into any prompt where the character's look matters. You never rephrase it, because "silver bob" and "short platinum hair" are two different instructions to a model.
Here is the lock for the character used in this guide's examples:
Mira: a stylised 3D animated woman in her late twenties, oval face, large grey-blue eyes, straight dark eyebrows, short asymmetric silver-white bob longer on the left, slim build, navy-blue bomber jacket with one white stripe on the left sleeve, plain white T-shirt, slate-grey cargo trousers, white high-top sneakers, small silver hoop in her left ear. Clean 3D animation style, soft cool lighting.
Three rules make a lock hold. Use concrete, visible nouns (a "white stripe on the left sleeve" survives; "a sporty vibe" does not). Put the signature detail on one side of the body, because asymmetry is the first thing to flip or vanish, so it doubles as your drift detector. And keep the style sentence inside the lock, so the look and the rendering style always travel together.
Working in stylised 3D like Mira? Our AI cartoon video prompts for 3D animation include a character design and consistency section that slots straight into this step and the next.
Character Lock Builder
You are a character designer preparing a character for AI video, where the same person must look identical in every shot.

My character idea: [DESCRIBE YOUR CHARACTER IN YOUR OWN WORDS]
Visual style: [e.g. photoreal cinematic / stylised 3D animation / 2D anime / claymation]

Write a "character lock": one paragraph of 40 to 70 words, in this exact order:
1. species, gender presentation and age range
2. face shape, eye colour and shape, eyebrows, one distinctive facial feature
3. hair colour, length, cut and parting
4. build and height impression
5. outfit from top to bottom, with exact colours and materials
6. one signature asymmetric detail (e.g. a scar, earring or patch on one side)
7. one sentence naming the rendering style and lighting

Rules: only concrete, visible details; no personality words; no brand names; no real people; plain colour names a model will read the same way every time.

Then give me:
- a 6-word short name tag for the character
- a list of 3 features the video model should ignore or never add (e.g. "no glasses", "no hat")
- 3 drift checks: details I should verify first in every generated clip
Step 2: Build a Reference Set That Holds
Your Element is only as good as the images inside it. Kling's guide recommends a front-facing main reference image "for higher consistency", with up to three supplementary images "from different angles or showing additional details". In practice the strongest set is four images of the same character in the same outfit:
- Front view, neutral expression: the main reference. Full body or at least knees up, arms slightly away from the body so the outfit reads.
- Three-quarter view: the angle most video shots actually use.
- Side profile: fixes nose, jaw and hair length during head turns.
- Back view or a face close-up: back view if the character walks away from camera a lot, close-up if the story is dialogue-heavy.
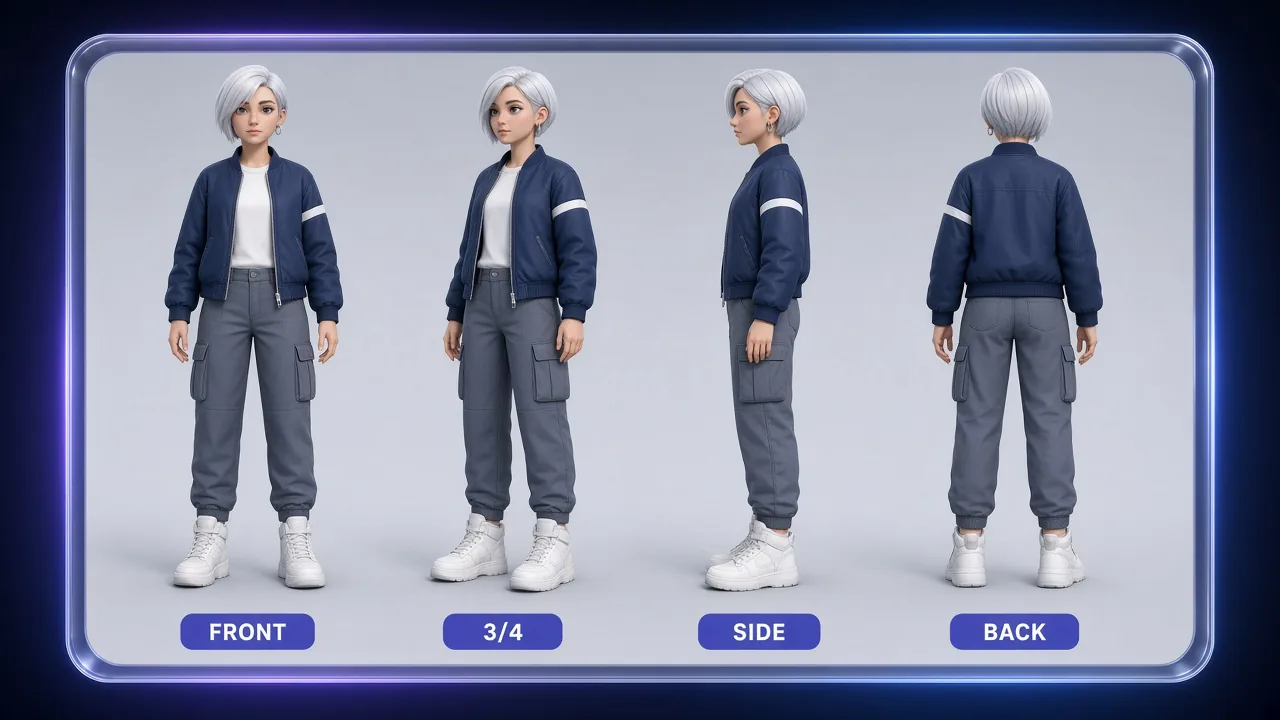
Keep the background plain grey or white, the lighting flat and even, and the outfit identical down to the sleeve stripe. A busy background gets absorbed into the character; dramatic lighting gets baked into the skin tone; a costume change between reference images teaches the model that the outfit is optional. If you are starting from scratch, a turnaround sheet is the fastest way to get matching angles in one go: our Character Turnaround Sheet prompt and Character Reference Sheet prompt are built for exactly this, and you can crop each view into its own image.
Character Turnaround Sheet for Kling Elements
Character turnaround reference sheet of [PASTE YOUR CHARACTER LOCK].

Layout: four full-body views of the same character side by side in one wide image, evenly spaced, same scale, same height line: front view, three-quarter view facing left, side profile facing left, back view. Neutral relaxed standing pose, arms slightly away from the body, neutral expression.

Background: plain flat light-grey studio background, no floor texture, no props, no shadows on the wall. Lighting: soft, even, frontal studio light with no coloured gels, so skin tone and outfit colours are accurate.

Consistency: identical face, hairstyle, outfit, colours and accessories in all four views; the signature detail stays on the same side of the body in every view.

Style: [RENDERING STYLE FROM YOUR LOCK], sharp focus, high detail.
Avoid: text, labels, watermarks, extra characters, outfit changes between views, cropped feet, dramatic lighting.
Generate it, then crop the four views into separate images at a decent size. Kling's Omni guide asks for images at least 300 px on each side, no larger than 10 MB, in JPG or PNG; aim far above that minimum so the face has real detail. If you only have a single good image, the Element Library can fill in the rest: its AI multi-view completion generates extra views from one main image. Kling's FAQ lists three free uses a day for members, then 5 credits per generation (5 credits each for non-members). It's convenient, but check every generated view against your lock before you accept it, because a wrong guess here is copied into every shot.
Pro tip: Make the reference set in the same rendering style as the final video. A photoreal reference animated in an anime style (or the reverse) forces the model to translate the face, and translation is where likeness goes first.
Step 3: Create the Element in Kling
You can create an Element from three places: "Create Element" inside the Omni input box, the "Bind elements to enhance consistency" button in VIDEO 3.0, or Assets → Elements. The flow is the same in each:
- Upload the main reference image: your front view. It is the primary source for the Element.
- Confirm the subject type. Kling detects it automatically (Characters, Animals, Items, Costumes, Scenes or Others); correct it if it guessed wrong.
- Bind a voice if the character speaks: upload a 5–30 second clip of one person talking (clean background, moderate pace, steady emotion), pick a voice from the Voice Library, or choose "No Voice".
- Add one to three supplementary images: your three-quarter, side and back or close-up views.
- Name it and describe it. Names must be unique in your library. In the description, paste your character lock, then the features to ignore from Step 1.
- Generate to save it. The Element now works in both image and video generation.
Kling's guide suggests the description should cover the Element's core characteristics, its key details and the features you want the model to ignore. That last part is the underused one: "no glasses, no hat, no facial hair" stops the model adding accessories it has seen on similar characters. Use a short, distinctive name too (Mira, not "girl 1"), because you'll be typing it after an "@" in every prompt.
Prefer a video Element if your character is a real performer you have rights to, or you want their voice. VIDEO 3.0 Omni accepts a 3–8 second clip of a single character, extracts the appearance and the native voice, and lets you keep or replace that voice. Kling recommends clips that show the character from several angles. How many Elements you can keep depends on your plan: 30 for non-members, 50 on Standard, 150 on Pro and Premier, 500 on Ultra. Creating one is free.
Step 4: Make an Anchor Frame for Every Scene
Text-to-video with an Element works, but image-to-video with an Element is steadier, because the start frame fixes the pose, framing, lighting and location before any motion happens. Think of the anchor frame as the first frame of a scene: your character, in the scene's location and light, in the pose the shot begins with.
Make it in Kling's image tools with the Element attached: IMAGE 3.0 Omni accepts up to 10 images or Elements in one generation, and its Image Series Mode turns one or several references into a set of related images (useful for a storyboard of start frames that share one look). Then, in VIDEO 3.0 image-to-video, upload the frame and use "Bind Subject to Enhance Consistency" to attach the same Element. Kling's guide recommends binding the Elements that actually appear in the start frame, and caps it at three. Kling's own side-by-side examples compare "start frame plus Element" with "start frame only" for this reason: the frame sets the scene, and the Element keeps the face when the camera starts to move.
Anchor Frame Prompt
Cinematic still, [SHOT SIZE, e.g. medium shot], [CAMERA ANGLE, e.g. eye level, three-quarter view].

[@CHARACTER] [STARTING POSE, e.g. stands at a rain-streaked bus stop, hands in jacket pockets, looking down the street].
[PASTE YOUR CHARACTER LOCK]

Location: [SCENE, e.g. a quiet city street at blue hour, wet pavement, distant neon reflections].
Lighting: [LIGHT, e.g. cool blue ambient light with a soft key from a shop window on the left].

Composition: character fully visible and in focus, face unobstructed, enough space around them for the planned camera move.
Style: [SAME STYLE LINE AS EVERY OTHER SHOT].
Avoid: extra people, text, outfit changes, accessories not in the lock.
For one character in many poses before you animate anything, our Cinematic Character Variations prompt produces a consistent pose set you can pick start frames from.
Step 5: Write Shot Prompts That Don't Re-Describe the Face
Once the Element is bound, the prompt's job changes. It no longer needs to explain who the character is; it needs to explain what they do, where the camera is and what stays the same. Re-describing the face in different words in every shot actually works against you, because the new wording competes with the reference. Kling makes the same point about voices: if an Element already has a bound voice tone, the guide advises against setting the tone again in the prompt.
The shot structure that holds up best, in this order:
- Reference call:
@Mira(or the Element picked from the library). - One action, with a clear start and end.
- One camera move and the shot size.
- Location and light, copied from the anchor frame.
- Continuity line: "same outfit, same hairstyle, same face as the reference".
- Style line: identical text in every shot of the project.
Kling Shot Prompt Template
[SHOT SIZE] of @[CHARACTER] [ONE ACTION WITH A START AND END, e.g. lifts her head, notices something across the street and smiles].

Camera: [ONE MOVE, e.g. slow push-in from medium to medium close-up], [LENS FEEL, e.g. 50mm, shallow depth of field].
Location and light: [COPY FROM THE ANCHOR FRAME].
Continuity: @[CHARACTER] keeps the same face, hairstyle and outfit as the reference; [SIGNATURE DETAIL] stays visible on the [LEFT/RIGHT] side.
Audio: [OPTIONAL, e.g. light rain and distant traffic; she says: "There you are."]
Style: [YOUR FIXED STYLE LINE].
Avoid: outfit changes, new accessories, extra people entering frame, sudden lighting changes.
Keep your settings as fixed as your words. Use the same model (don't switch between 3.0 and an older model mid-project), the same aspect ratio, resolution and quality mode, and similar shot lengths. Changing any of them changes how the face is rendered. Five to ten seconds per shot is a sensible middle ground: long enough for an action to land, short enough that a slow camera move doesn't have to invent a new side of the character.
Step 6: Use Multi-Shot to Keep a Scene in One Generation
The single biggest consistency upgrade in Kling 3.0 is that a whole scene can live inside one generation. VIDEO 3.0 and 3.0 Omni generate up to 15 seconds, with a flexible duration from 3 to 15 seconds, and the "Multi-Shot" switch lets the model plan the cuts itself. Turn on "Custom Multi-Shot" (it needs Multi-Shot switched on first) and you set the number of shots and each shot's duration, which Kling says the model will then strictly follow. Shots generated together share one understanding of the character, so there is no fresh roll of the dice at every cut.
Kling's own Omni examples write scenes as numbered shots with durations, each one calling the Elements by name. That format is worth copying exactly:
Multi-Shot Scene Prompt (One Character)
Custom multi-shot, [TOTAL] seconds. Location for all shots: [LOCATION]. Lighting for all shots: [LIGHT]. Style for all shots: [STYLE LINE].

Shot 1 ([X]s): Wide shot. @[CHARACTER] [ESTABLISHING ACTION, e.g. walks into an empty night market as stalls are closing].
Shot 2 ([X]s): Medium shot, tracking alongside. @[CHARACTER] [SECOND ACTION, e.g. slows down and looks at a lantern stall].
Shot 3 ([X]s): Close-up on @[CHARACTER]'s face. [REACTION, e.g. a small surprised smile]. She says: "[LINE OF DIALOGUE]"
Shot 4 ([X]s): Over-the-shoulder shot from behind @[CHARACTER]. [WHAT SHE SEES OR DOES NEXT].

Continuity across all shots: same face, hairstyle and outfit as the @[CHARACTER] reference; [SIGNATURE DETAIL] on the [SIDE] in every shot; no costume changes; no other named characters.
Keep the location, light and style identical across the shots in one generation unless the story moves somewhere new. A cut from close-up to wide is easy for the model to keep consistent; a cut from a night market to a sunlit beach inside the same generation asks it to restyle everything, including the face. For an eight-beat structure you can adapt, the Cinematic 8-Shot Character Action Sequence template shows how to break action into beats that read on screen.
Step 7: Chain Clips With End Frames and Extend
Fifteen seconds is a scene, not a film. Anything longer means joining generations, and the joins are where consistency breaks. Kling gives you three ways to make them hold.
Start and end frames
In Image to Video, "Add End Frame" lets you upload a second image so the clip begins on one frame and lands on another. Kling's guide warns that the two frames "should be as similar as possible", because big differences can trigger a shot switch. Use it for moves you can picture as two stills: Mira seated, then Mira standing at the window, same room, same light. Generate both stills from the same Element in the same style, and the clip has a fixed identity at both ends.
The last-frame handoff
The most reliable way to join two clips is to start the second one from the exact final frame of the first. Export the last frame, use it as the start frame of the next image-to-video generation, and bind the same Element again. If you edit locally, one ffmpeg command grabs that frame:
ffmpeg -sseof -1 -i shot-01.mp4 -update 1 shot-01-last-frame.png
The new clip now begins where the last one ended, in the same pose and light, so the cut is invisible and the face has nowhere to wander at the join.
Extend with Prompts
For continuous action, Kling's "Extend with Prompts" tab (bottom left, under a generated video) adds roughly 4–5 seconds per extension and can be repeated up to a total of 3 minutes. "Auto-Extend" lets the model continue on its own; "Customized Extend" takes a prompt. Kling's advice for that prompt is subject plus movement, and to keep it about the same main subject, because unrelated text can cause a cut or transition. Its guide also notes that extending is probabilistic and may need a few tries.
Customized Extend Prompt
@[CHARACTER], the same woman from the original clip, [CONTINUES THE SAME ACTION OR ITS NATURAL NEXT STEP, e.g. keeps walking past the lantern stall and turns her head to the left].
Camera continues the same [MOVE] at the same speed. Same location, same lighting, same outfit. No cut, no new characters, no change of time of day.
Every extension builds on the one before, so small drift compounds. Check your drift detector (Mira's left-sleeve stripe, for example) after each extension; the moment it flips or fades, go back one step and regenerate rather than extending a damaged clip.
Advanced Control: Motion Control and Motion Brush
Two more tools help when the problem is movement rather than identity.
Motion Control 3.0 copies a performance from a reference video onto your character image. VIDEO 3.0 Motion Control adds "Bind Facial Element to Enhance Facial Consistency", and Kling's showcases compare results with and without the bound Element across head turns and occlusion. Two limits matter. The Motion Control Element uses facial information only, not clothing, hairstyle, makeup or props, so the outfit still comes from your character image. And binding only works when "Character Orientation Matches Video" is selected. Kling recommends clear facial close-ups that match the result you want: a front view plus side views for head turns, a neutral plus a smiling front view for expressions, and a video for complex emotional changes. Only one Element is supported per Motion Control generation; if the first frame has several people, the largest one on screen is chosen.
Motion Brush, in Image to Video, lets you select up to six areas or elements and draw a path for each, with a matching "element + motion" text prompt. The Static Brush pins areas in place and stops the camera drifting. For consistency the Static Brush is the useful half: pin the background and the character's surroundings and the model spends its effort on the motion you asked for instead of re-imagining the frame. Kling's guide doesn't list which models support it, so look for it in your model's tool panel.
Multi-Character Scenes Without Swapped Faces
Two characters is where most consistency workflows fall apart, and Kling 3.0 is noticeably better prepared for it than earlier versions. Kling lists "Multi-Character Coreference (3+)" as new in VIDEO 3.0, and VIDEO 3.0 Omni takes up to seven images or Elements in one generation (four if a video is also in the input). In VIDEO 3.0 image-to-video you can bind up to three Elements, as long as they appear in the start or end frame. Inside those limits, five habits keep each character themselves:
- One Element per character, each built with the Step 2 process, and named distinctively: Mira and Theo, not "woman" and "man".
- Make them easy to tell apart. Different silhouettes, hair colours and outfit colours give the model less reason to blend them. Two people in matching black suits invites face swaps.
- Tie every detail to a name. "@Theo holds the umbrella" rather than "one of them holds an umbrella". Unowned details float between characters.
- Pair each line with its speaker. Kling's guide says that when you specify dialogue for each character, VIDEO 3.0 matches each character with their lines; write it as
@Mira says: "...", one speaker per line. - Keep the blocking simple. One action per character per shot, and avoid having them cross in front of each other; occlusion is where faces get mixed.
Two-Character Dialogue Scene
Custom multi-shot, [TOTAL] seconds. Location for all shots: [LOCATION]. Lighting: [LIGHT]. Style: [STYLE LINE].
Characters: @[CHARACTER A] ([ONE-LINE VISUAL TAG, e.g. silver bob, navy bomber jacket]) and @[CHARACTER B] ([ONE-LINE VISUAL TAG, e.g. black curly hair, long olive raincoat]).

Shot 1 ([X]s): Wide two-shot. @[CHARACTER A] stands on the left, @[CHARACTER B] on the right, facing each other. [SHARED SITUATION].
Shot 2 ([X]s): Close-up on @[CHARACTER A]. @[CHARACTER A] says: "[LINE A]"
Shot 3 ([X]s): Close-up on @[CHARACTER B]. @[CHARACTER B] answers: "[LINE B]"
Shot 4 ([X]s): Medium two-shot. @[CHARACTER A] [ACTION A] while @[CHARACTER B] [ACTION B]. They stay on their own sides of the frame.

Continuity: each character keeps their own face, hair and outfit from their reference in every shot; @[CHARACTER A] stays on the left and @[CHARACTER B] on the right; no outfit or accessory swaps between them; no other people.
If the characters need voices, bind a different voice to each Element when you create it. That way the right voice follows the right face without any voice instructions in the prompt. If you generate the voice samples rather than record them, our ElevenLabs pricing guide shows which plan covers voice cloning for a small cast.
Troubleshooting Character Drift in Kling
Most failures fall into a handful of patterns, and each has a specific fix. Work down this table before regenerating the same prompt a fifth time.
| Problem | Likely cause | Fix |
|---|---|---|
| Face drifts during the shot | Element not bound, or only one reference image | Bind the Element; rebuild it with 3–4 angles; shorten the shot or slow the camera move |
| Face changes between clips | Fresh start each time, wording changed | Last-frame handoff into the next clip; paste the identical character lock; same model and settings |
| Outfit changes or simplifies | Outfit varies across references, or isn't in the description | Same outfit in every reference image; outfit in the Element description; continuity line in the prompt |
| Style shifts (realistic to cartoonish) | Style words differ between shots, or references in a different style | One fixed style line for the whole project; references in the final style |
| Extra limbs, merged hands, extra fingers | Too much action in one shot, fast motion, occlusion | One action per shot; slower, simpler movement; keep hands away from the face; regenerate the shot |
| Signature detail flips sides or disappears | Mirrored reference, or the detail is too small | Check no reference is mirrored; name the side in the lock; make the detail bigger |
| Characters swap features | Unowned details, similar-looking characters | Distinct designs; tie every detail to an @name; fixed left/right blocking |
| Unexpected cut in an extension | Extend prompt describes something new | Customized Extend with the same subject and movement; or Auto-Extend |
| Voice changes between videos | Voice described in the prompt instead of bound | Bind a voice to the Element; remove voice instructions from the prompt |
| Accessories appear (glasses, hats) | The model fills in "typical" details | List them under features to ignore in the Element description, and in the avoid line |
Pro tip: Judge drift on a still, not on the playing clip. Pause on the frame where the character is turned furthest from the reference angle and compare it against your front view. Motion hides problems that a frozen frame shows instantly.
What Kling 4.0 Changes
Kling announced Kling 4.0 at the end of September 2026. Its official page (checked October 11, 2026) says the full model launches this October, with Kling 4.0 Flash already out to a limited group of creators, starting with Ultra Yearly subscribers. For character work, the announced changes are significant:
- Bigger Omni Reference: up to 15 reference assets per generation, including up to 10 images, up to 5 videos (30 seconds in total) and up to 7 subjects, with a voice for a subject.
- Native 30-second generation, double Kling 3.0's 15 seconds, so more of a scene lives in one generation.
- Up to 10 keyframes on the timeline to pin poses, expressions and shot changes.
- Video extension forward or backward up to 2 minutes, listed as coming soon.
Kling 4.0 Flash supports text-to-video, image-to-video and Omni Reference, up to 20 seconds at up to 720p, but not first/last frames or multi-keyframes, so the end-frame techniques above need the full model or 3.0. The good news is that nothing in this workflow goes out of date: a strong reference set, a fixed character lock and named references are exactly what a bigger reference system needs. If you're choosing between Kling and other video models for character work, our Gemini Omni vs Seedance 2.0 vs Kling 3.0 vs Wan 2.7 comparison covers the field.
The Tool Stack for Consistent Characters
| Job | Tool | Why |
|---|---|---|
| Writing the character lock | Any capable chat model, e.g. Genspark | Turns a loose idea into a fixed, concrete description |
| Turnaround and reference views | Kling IMAGE 3.0 / 3.0 Omni, or an image tool like OpenArt | Matching angles on a plain background |
| Element, anchor frames, video | Kling VIDEO 3.0 / 3.0 Omni | Elements, bound subjects, Multi-Shot, end frames, Extend |
| Performance copying | Kling VIDEO 3.0 Motion Control | Copies movement while a facial Element holds the face |
| Voice for the Element | Your own recording, Kling's Voice Library, or a voice tool like ElevenLabs | One clean 5–30 second sample per character |
| Joining clips | Any editor, plus ffmpeg for last frames | Frame-accurate handoffs between generations |
My Take: Consistency Is a Workflow, Not a Setting
Honest answer: there is no single switch in Kling that makes a character consistent, and there is no seed to lock. What Kling 3.0 gives you instead is better: a real reference system. Elements with up to four angles and a bound voice, up to three Elements locked onto a start frame, seven references in Omni, and Multi-Shot scenes up to 15 seconds. Used together, they keep a character recognisable across a short film.
The work that decides the result happens before the first video credit is spent. Write the lock, make a flat and boring turnaround, build the Element properly, and give every scene an anchor frame. After that, Kling's job is mostly to move your character, not to reinvent them, and that's a job it does well.
Frequently Asked Questions
8 questions answered